How can I use the Calendar app on my Samsung smartphone?
Systematic planning and scheduling can help you lead to a success as you spend your time wisely. Get to know how to manage your schedule using this simple and efficient Samsung Calendar app. It has a variety of features to organize your diary, so you can meet all your needs to stay on top of your routine.
Before you try out below recommendations as to your solutions, be sure to check if your device's software and related apps are updated with latest version. Please check how to update your mobile device's software in following order.
Step 1. Go to Settings > Software update.
Step 2. Tap on Download and install.
Step 3. Follow the on-screen instructions.
Basic navigation of the Calendar app
Before you start using Calendar, if you understand the meaning of the icons, you will be able to learn how to use them more easily.

1. Menu: Tap here for more options.
2. Date Select: Tap here to quickly change the date, month and year to jump to a specific date.
3. Drawing mode: This option is only available while looking at the monthly view on specific devices that have an S pen. Use drawing mode to doodle on your calendar just like if it were hung on the wall.
4. Today: This button will quickly take you to the current date.
5. Events: You can see the title of your events on the calendar itself. Tap an event to expand it.
6. Selection box: The outline around a date shows you the date you have selected. When you open the calendar, it will automatically select the current date.
7. Current date: The current date will be highlighted to make it easier to see.
8. Add event: Tap this button to create an event. The date of the event will be automatically entered as whichever day is currently selected with the selection box.
- Swipe left or right: Swipe left or right to switch the month that you are currently looking at.
- Swipe up: Swipe up one or two times to see more information about the date that you have selected.
When you first start up, you can link to your calendar by choosing from four accounts: your Samsung account, Exchange (Outlook), Google, or Microsoft. After entering your email address and password, your existing schedules will be synchronized.
How to change your settings for the calendar
Step 1. Open the Calendar app and tap Menu (three horizontal lines).
Step 2. Tap on a Settings icon.

- First day of the week: Of the 7 days of the week, you can set the day you want as the first day of the week.
- Alternate calendar: Samsung Calendar offers a total of five alternative calendars. These are Korean lunar, Chinese lunar, Vietnamese lunar, Hijri, and Shamsi.
- Show week numbers: This setting allows you to add a number to your calendar that tells you the number of weeks.
- Hide declined event: You can hide the schedules you denied.
- Highlight short events: You can highlight events in a short time.
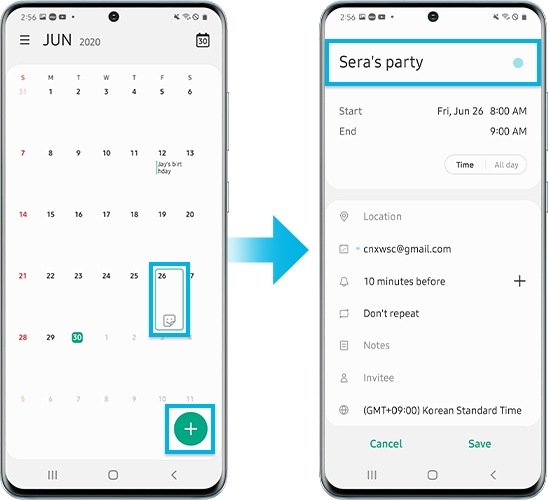
Step 1. Open the Calendar app, and then click the date you want to add the schedule.
Step 2. Tap on the + icon > change the Title of the event

Step 3. If you want to note the duration of the event, set Start and End date and time.
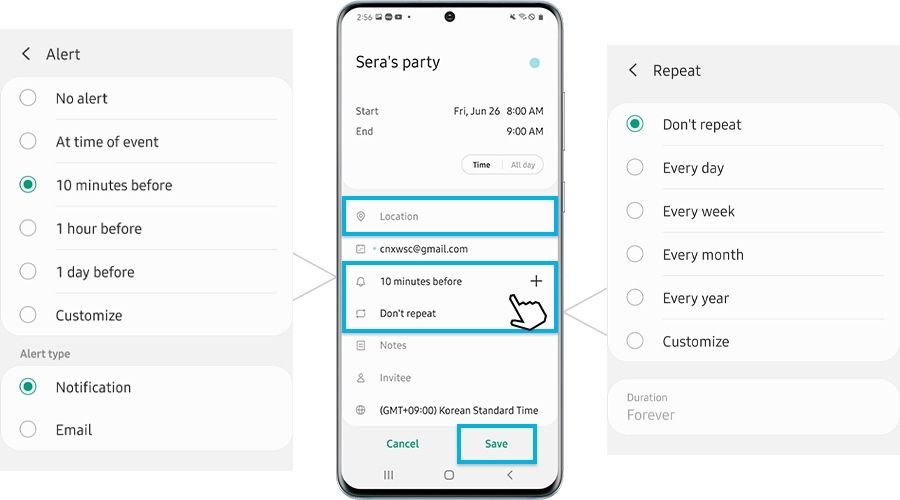
Step 4. If necessary, you may enter Location and Alert types and settings (methods/timing/multiple alarm/repetition) and then Save the event.

How to delete or edit an event
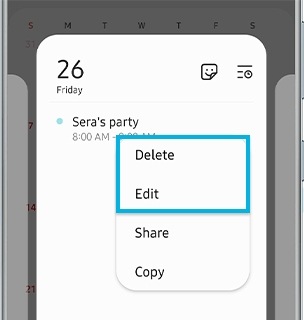
Step 1. Tap the date of an event you want to delete or edit > Tap and hold the event.
Step 2. Tap Delete or Edit to edit the event in detail.

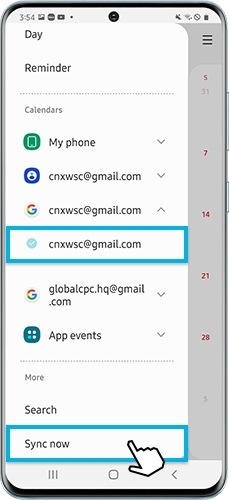
Step 1. Open the Calendar app and tap Menu (three horizontal lines).
Step 2. Select an email and tap on the accounts
Step 3. Tap on Sync now.

Step 1. Click on the date you want to share with > Tap and hold on the event.
Step 2. Tap Share > choose Share as Calendar file or text.

Step 3. Tap on the app.
Note: Device screenshots and menu may vary depending on the device model and software version.
Thank you for your feedback!
Please answer all questions.