How to use your Samsung Odyssey OLED G8 Gaming Monitor

The new Samsung Odyssey OLED G8 Gaming Monitor features vivid colors and pure blacks with superior contrast. Plus, it includes an Ultra-WQHD display (3440 x 1440) with a 21:9 ratio and a slim metal design. With its fast 0.1 ms response time and 175 Hz refresh rate, you can experience near instant reaction time when gaming.
Note: If you are experiencing issues with your Samsung Odyssey OLED G8 Gaming Monitor, please check for available software updates. Device screenshots and menus may vary depending on the device model and software version. When playing 21:9 content from OTT (over-the-top) apps, the content may not play in full screen mode, depending on the policy of the content provider.

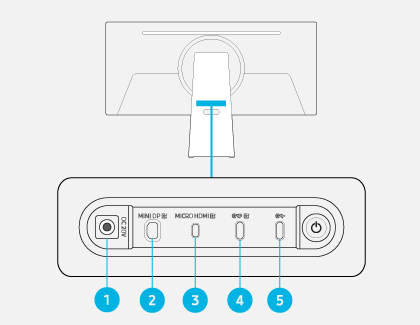
Note: Lower version cables do not support the video input function (Displayport ALT). A maximum of 65W charging power is supported. The charging speed may vary depending on the connected device.
Note: A maximum of 15W charging power is supported. The charging speed may vary depending on the connected device.
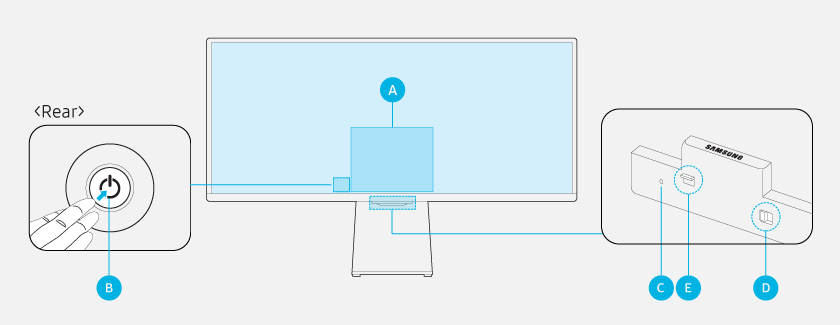
You can control your monitor by using the Jog Controller button located on the back of the monitor.

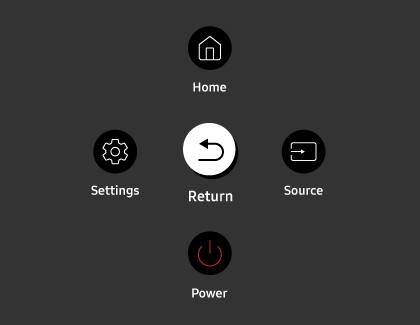
A. Control Menu

- Home: The Home screen appears.
- Settings: A menu to change monitor settings will be displayed. When Game Mode is turned on, you can press and hold the Settings button to run the Game Bar.
- Return: Exits the function menu screen.
- Source: You can change the input source. The external input will be displayed on the bottom of the screen.
- Power: The monitor will turn on or off.
B. Controller button
- Press button: Displays the Control Menu. Select or run a focused item on the menu.
- Press and hold button: The current function will stop.
- Up/Down button: Changes the channel.
- Left/Right button: Changes the volume.
Note: The buttons may work differently depending on the situation.
C. Microphone
D. Microphone switch
You can enable or disable the microphone by using the switch at the bottom of the monitor. If the microphone is turned off, all microphone-related voice and sound features will not be available.
Note: The position and shape of the microphone switch may differ depending on the model. Microphone data will not be saved.
E. Power indicator
- The LED will turn on when the monitor is turned off.
- The LED will blink when the monitor enters standby mode. When 60 seconds elapses with no signal, the monitor will enter standby mode. The screen will turn on again when a signal is input or a button is pressed on the remote control.
Notes:
• The color and shape of parts may differ from what is shown.
• The screen may dim if the protective film on the SAMSUNG logo or the bottom of the monitor is not removed.
• When using the buttons (excluding the Power button) on the Samsung Smart Remote, the receiver LED will not blink.
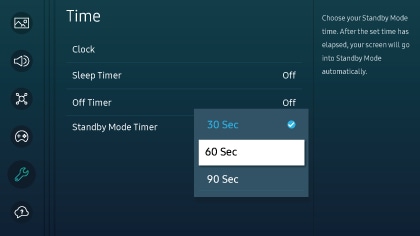
If there is no external input signal, the monitor’s screen will enter Standby Mode after a certain period of time. You can choose your Standby Mode time duration from the Standby Mode Timer menu. After the set time has elapsed, the screen will go into Standby Mode automatically. The default value is 60 seconds. However, you can also set it to 30 or 90 seconds instead.

• 3440 x 1440 @ 120 Hz or 3440 x 1440 @ 175 Hz is not supported when connecting to a PC
If you cannot set 3440 x 1440 @ 120 Hz, or 3440 x 1440 @ 175 Hz, make sure Game Mode is turned on. To enable Game Mode, navigate to Menu, then select Settings, and then select All Settings. Select Game, and then select Game Mode. While Game Mode is on, the optimal viewing resolution is 3440 x 1440 @ 120 Hz and the highest resolution is 3440 x 1440 @ 175 Hz (Freesync/VRR). Make sure that your PC’s graphic card is up to date and that you are using a certified and compatible HDMI cable.
Note: The FreeSync (VRR) function only works in HDMI mode and Display Port mode. Turn on the AMD graphic card’s FreeSync function.
• The PC screen does not appear or it flickers
If the screen does not appear or the PC is not recognized, check the power supply and then reconnect the HDMI cable. If the symptom persists, make sure the PC is not in Sleep mode, and then set Input Signal Plus to ON by navigating to Menu, and then selecting Settings. Select All Settings, then select Connection, and then select External Device Manager. Select Input Signal Plus.
• The displayed image size does not fit the screen, the device name is “Unknown”, or the Expert settings option is grayed out
To fix this, edit the name of the external device. When connecting to a PC, the name must be set to “PC.” Navigate to Menu, then select Connected Devices, and then select HDMI. Press the down directional button, and then select Edit to edit the external device’s name.
Thank you for your feedback!
Please answer all questions.
RC01_Static Content


